Need some help in the kitchen? While we can't offer you another set of hands or extra counter space, how about the next best thing?
Whether you're a master chef or total newbie, we guarantee you'll want to adopt a few of our cooking tips. We're dishing out kitchen tactics to improve the way you prep, cook and store food, plus ways to make your kitchen appliances and gadgets work harder for you. Tie on your apron, roll up your sleeves, and let's get going!
01: How to Prevent Food From Sticking
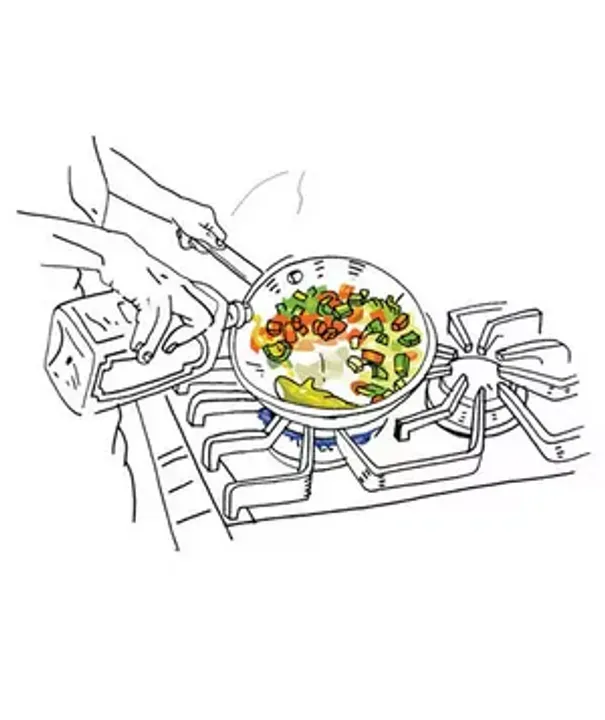
Love searing in your stainless steel skillet, but prefer to skip scrubbing after peppers melt to the bottom mid-sauté? A little more oil should help, but don't drizzle it on top of the food, or you'll end up with a greasy, soggy mess.
Heated oil in a hot pan creates a smooth, nonstick surface, ensuring a solid sauté. Here's how to do it in three easy steps.
Step 1. Use a metal spatula to loosen any veggies or meat, then push them to the side of the pan.
Step 2. Tilt the pan so the empty space is over the flame.
Step 3. Add 1 to 2 tablespoons of oil to the empty area and let it heat up before moving the food back over.
02: Revive Crystallized Honey
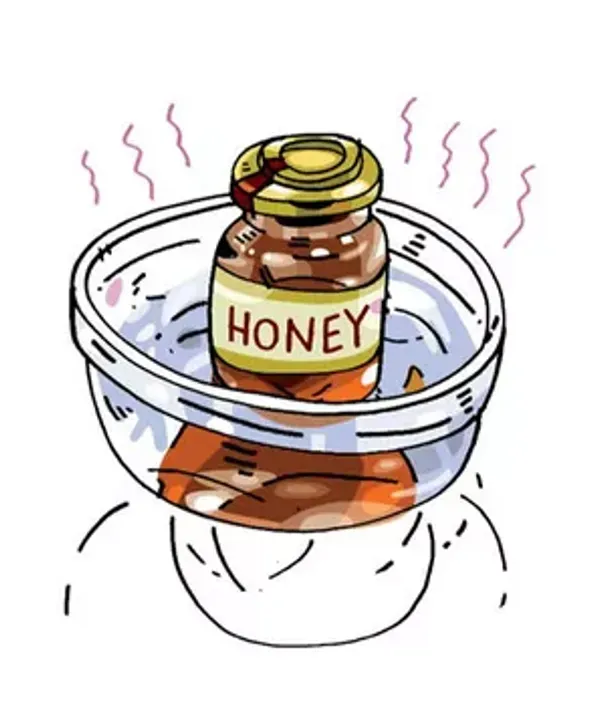
Ever head to your pantry, only to find a hard, bulky mass of crystallized honey in your bear-shaped bottle? Don't toss! Honey never spoils, but it does crystallize in humid conditions.
To bring it back to a luscious state: Set the container in a bowl of hot water until the honey is uniform and liquid (5 to 10 minutes). Alternatively, take off the lid and microwave the jar in 30-second intervals, checking after each one.
To prevent crystals from re-forming: Store honey in a cool, dry place (not the refrigerator) and avoid introducing moisture. That is, no double-dipping when your spoon goes from your tea to the bottle.
03: Safely Slice Rolly-Polly Veggies
To keep your fingers safe from cuts, use this technique on round, wobbly vegetables, like potatoes, squash, and beets.
Step 1. Using a sharp knife and cutting board, cut a thin sliver lengthwise off the vegetable to create a flat side.
Step 2. Flip the vegetable cut-side down on the cutting board (making sure it's stable and won't roll) and slice as desired, stopping when the vegetable gets wobbly and hard to grab.
Step 3. Flip the vegetable so the wide, flat side you made with your last cut is face-down on the cutting board, then continue slicing as desired.
04: How to Make Simple Syrup
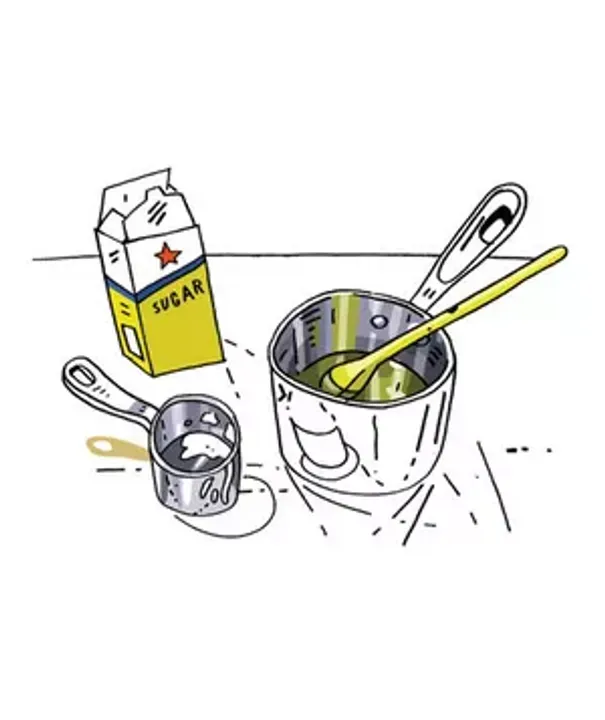
Want to sweeten your lemonade or iced tea? Instead of reaching for the sugar bowl, you'll get a better result—no sandy granules at the bottom of your glass—if you mix up a batch of simple syrup. Here's how.
Step 1. Combine equal parts of water and sugar in a saucepan and cook over medium heat, stirring frequently, until the sugar is completely dissolved (3 to 5 minutes).
Step 2. Let cool, then add to drinks as needed.
Use 1½ teaspoons of simple syrup for every teaspoon of sugar you'd normally use, and store the syrup in the refrigerator for up to 2 weeks. We told you it was simple!
05: Keeping Produce Fresh
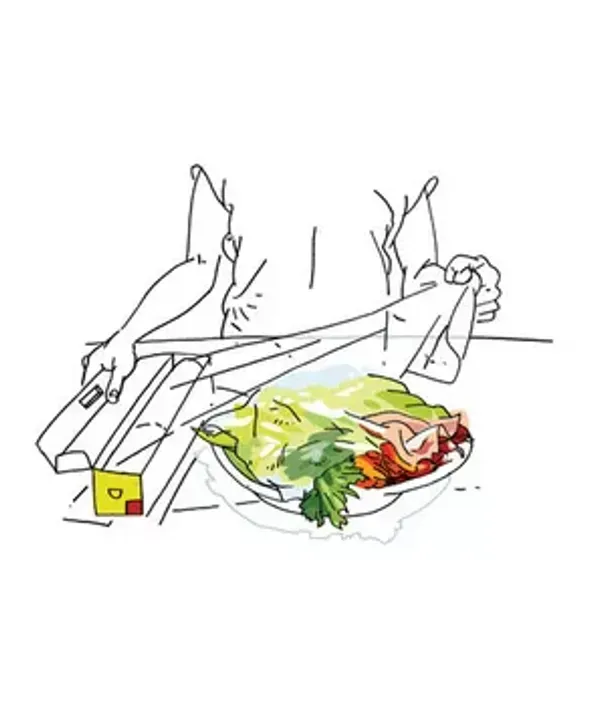
Use this strategy to keep cut-up produce crisp and vibrant for up to 12 hours, because there's nothing appealing about a platter of limp broccoli florets and dried-out carrot sticks.
The trick: Cover everything with a layer of damp paper towels, then wrap the platter in plastic wrap and stash in the refrigerator until party time (aka crunch time).
06: How to Grill Corn
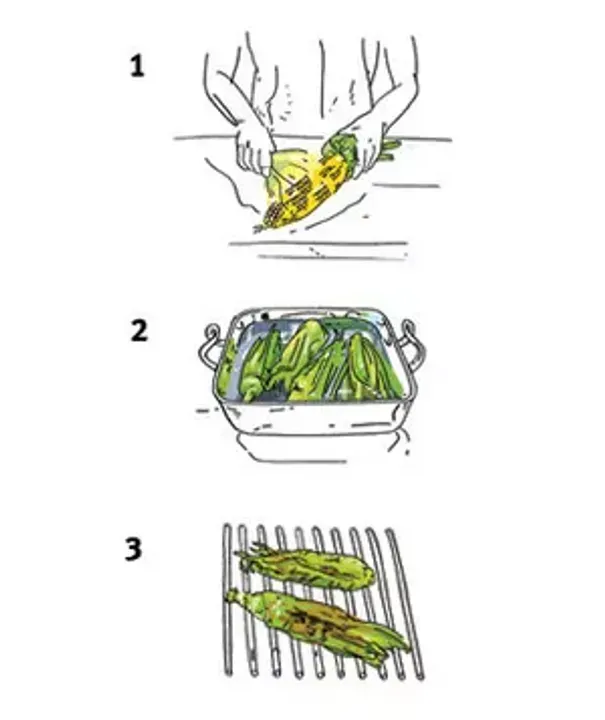
It's hard to beat the smoky-sweet taste of fresh corn grilled to perfection. Here's how to do it just right.
Step 1. Pull back the husks from the corn, but leave them attached at the stem. Remove and discard the silk.
Step 2. Pull the husks back up around the corn. Soak the ears in a pan or large bowl filled with water for 15 minutes. (This prevents the husks from burning.)
Step 3. Grill the corn over medium heat, turning frequently, until the kernels are tender and the husks are lightly charred, 8 to 10 minutes.
07: Instant Green Bean Trimming
Sitting with a bushel of fresh green beans and carefully snipping off the ends of each one can be quite relaxing—if you're perched on a porch swing on a lazy evening. But if you have a cluttered countertop and 15 minutes until dinner, try this instead.
Step 1. Line up the beans so the stems are all facing one way. (The tough, knobby ends of the beans need to be removed, but the other ends—the slender, tapered tips—are tender and perfectly edible.)
Step 2. Jostle a handful on your palm so they're even, then use a chef's knife to lop off the knobby ends in one fell swoop.
08: Making Stronger Iced Coffee and Tea
Too often, iced drinks made at home turn out weak and watery—total buzzkills. That's because simply mixing regular-strength coffee or tea with ice dilutes it. But giving your iced beverage more muscle is easy: Just make it double-strength.
For iced coffee: Use ¼ cup of ground beans for every cup of water.
For iced tea: Use 2 tea bags for every cup of water.
Now you can chill, ice, and start your day with a cold drink that stands up to the heat.
09: Mastering Whipped Cream
Achieving soft peaks—and not going too far (hello, butter!)—is easy when you take these three tips for making whipped cream to heart.
Start with the right ingredients. For fluffy, stable whipped cream, use cartons labeled "heavy cream," "whipping cream," or "heavy whipping cream." (Save the light cream for your coffee.) For sweetness, add 2 tablespoons of confectioners' sugar per cup of cream before whipping.
Watch closely. In a chilled bowl, using an electric mixer on high power, whip the chilled cream and sugar until they leave visible streaks when drawn through the cream. Reduce the mixer speed to medium-low and continue whipping until soft peaks form. (When you hold up the beaters, the cream should rise and then flop over.)
If you over-whip, don't panic. Add a bit of fresh, unwhipped cream to the curdled clumps and mix with a rubber spatula. Repeat as needed until the mixture is smooth.
10: The Clean Way to Crack an Egg
When you tap a fresh egg against the edge of a bowl, you're not just breaking the shell. The thin membrane surrounding the white and yolk also ruptures, allowing tiny shards of shell to mingle with the liquid and add unwanted crunch to your finished dish (the worst omelet ingredient ever).
Instead, crack the egg against a flat surface, like a counter, to create a clean break. That way, the membrane stays intact, meaning no shell in your scramble. Here's the technique.
Step 1. Holding the egg in one hand, firmly tap it against a hard surface.
Step 2. Inspect the break: You should see a dent and single side-to-side crack, like an equator.
Step 3. Position your thumbs on either side of the crack and gently pull the shell apart. Any shards will cling to the membrane, instead of falling into the bowl.
11: Measure Your Oven’s Temperature
Ovens lie. You may have it set to 180°C but your last batch of brownies was soft even though you followed the baking time. What gives? After time, ovens can lose their accuracy, with temperatures being up to 4°C off from what you set them to. To check yours out, do this.
Step 1. Place an oven-safe thermometer on the center rack and preheat the oven to 150°C.
Step 2. When the oven indicates that it has reached that temperature, check the thermometer.
If it reads 140°C, you know you need to regularly set the temperature 4°C higher. When you grow tired of doing the math, seek a permanent fix by calling a manufacturer-recommended repairperson.
12: How to Mince Garlic
Love cooking with garlic, but hate struggling with the sticky, paper-thin skin? With these three steps—trim, smash, slice—you’ll have cloves prepped in no time.
Step 1. With the tip of a chef’s knife, cut off the tough root end of each clove. (This makes the skin easier to peel.)
Step 2. Place a clove under the flat side of the knife with the blade facing away from you. Press down on the knife with your palm or fist until you feel the clove give way. Peel off and discard the skin.
Step 3. Gather the peeled cloves, hold the knife at the handle, and position your other, non-dominant hand on the blade. Rock the knife up and down over the cloves (keeping the tip on the cutting board). Mince until the garlic is your desired size.
13: Removing Salmon Bones
Before a salmon fillet reaches your supermarket seafood case, a fishmonger removes the backbone and rib bones. But they don’t always catch the thin, pliable pin bones that are “swimming” in the meat. Here’s a quick way to eliminate them at home.
Step 1. Run your index finger across the central seam of the fillet, going against the grain. If pin bones are present, you’ll feel them protruding at about ½-inch intervals.
Step 2. With clean tweezers, grasp the tip of a bone and pull it out at a slight angle, not straight up and out. (Pin bones grow diagonally toward the fish’s head.) Repeat as necessary.
14: Create Prettier Salads
Sure, your food processor is great at grating vegetables…into short, stout strands. Next time you pull it out to make a slaw or salad, try this.
Step 1. Cut carrots, broccoli stems, or apples into pieces that are the same width as the feed tube (usually about 4–5 inches).
Step 2. Instead of feeding them into the tube vertically, lay them on their sides to create long, elegant strands.
15: Sheet-Pan Multitasking
Nine-by-13-inch baking sheets, also called “quarter-sheet pans” or “small jelly-roll pans,” are handy for roasting foods with different cooking times, since two sheets fit side by side in the oven. See what else they’re great for.
Corrall recipe ingredients: Want someone else to start dinner? Gather the meats, vegetables, and other perishables that a recipe calls for on a sheet pan in the fridge to make things easier for your kitchen helper.
Catch oven drips: To contain the gooey overflow of mini potpies, baked macaroni and cheese, French onion soup, and fruit crisps, cook them on a sheet pan. You’ll keep your oven floor clean and leave the rack space open for the rest of the meal.
Make deep-dish pizza: You don’t need a specialty pan to make an awesome Detroit-style pie. Lightly oil a sheet pan (the sides, too), press your dough down and up the sides, and then layer on your favorite toppings.
Freeze cookie dough: The shallow depth of a sheet pan makes it ideal for freezing cookie dough or berries. Just slide the pan right on top of the ice-cream box or other even surface. Once they’re solid, transfer them to a container.
16: How to Season a Cast-Iron Pan
A cast-iron skillet is an affordable classic that has a place in every kitchen. Cast iron distributes heat evenly and retains heat, so it is great for searing and frying. Its natural nonstick surface—a product of “seasoning,” a method used to seal and smooth the iron—makes it a good choice for delicate items, like breaded cutlets. Some skillets come pre-seasoned. If yours doesn’t or you have one to re-season, here’s how to easily get it in shape.
Step 1. Wash the skillet with hot, soapy water and a stiff brush, then rinse and dry it thoroughly. Use a folded paper towel to rub a thin, even coat of vegetable oil over the skillet, inside and out.
Step 2. Lay a sheet of aluminum foil on the bottom rack of the oven to catch drips, then place the skillet on the top rack at 180°C for 1 hour.
Step 3. After an hour, leave the skillet in the oven to cool down with it.
17: How to Clean a Seasoned Cast-Iron Pan
When it comes to cleaning a seasoned cast-iron pan, it’s important to remember that you shouldn’t use soap or scouring powder, as these will ruin the nonstick coating. Do this instead.
Step 1. Sprinkle the pan with kosher salt and wipe it out with a paper towel.
Step 2. Rinse the pan under hot water.
Step 3. Immediately dry the pan thoroughly with paper towels, then rub in a thin, even coat of vegetable oil.
If you’re storing the cookware in a stack, place a paper towel on top of the skillet to protect its surface.
18: Prepping Hearty Greens
Hearty greens, like kale, chard, mustard greens, and collards, make delicious sautés and are a tasty addition to soups, but first you have to remove their tough stems. Instead of cutting them out with a knife, simply "strip" off the leaves.
Step 1. With one hand, hold a leaf at the bottom by the thickest part of the stem.
Step 2. With your other hand, gently pinch the leaf between your index finger and thumb and pull it up and away along the stem.
19: How to Soften Brown Sugar
Halfway through a banana-bread recipe, you realize that your brown sugar is a solid, rock-hard mass. Read on to learn how to rescue your block.
Tip: Place a block of sugar in a bowl, sprinkle with a teaspoon of water, cover with a damp paper towel, and microwave in 30-second intervals (checking each time) until soft. It may take a few minutes.
To keep a new package fresh, place the whole bag of brown sugar in an airtight container or resealable freezer bag and store at room temperature.
20: Cutting a Pineapple
Supermarkets often charge twice as much for cut-up pineapple than they do for the same amount of the whole fruit. Here's an easy way to tackle this tricky task yourself.
Step 1. With a serrated or chef's knife, cut off the top of the pineapple and a thick slice from the bottom.
Step 2. Stand the pineapple upright and, working from top to bottom, slice off the rind in strips, following the contours of the fruit. Use a small paring knife to remove any remaining eyes.
Step 3. Cut the pineapple lengthwise into wedges, then cut out the core from each wedge.
Step 4. Slice the pieces as desired.
Cut pineapple will keep in the refrigerator for up to 3 days.
21: Easy Homemade Breadcrumbs
Use leftover bread to make your own breadcrumbs. It's a great way to use leftover old bread and other stale bits and then turn them into breaded cutlets, make meatballs, or add a crispy topping to casseroles.
Step 1. Store scraps of bread in a large zip-top plastic bag in the freezer.
Step 2. When the bag is full, chop the bread into large pieces and pulse them in a food processor until fine crumbs form.
Step 3. Toast the crumbs on a rimmed baking sheet in a preheated 180°C oven, stirring once, until completely dry (4 to 6 minutes).
Store the crumbs in the freezer for up to 6 months.
22: Storing Leftover Tomato Paste
Most recipes that call for tomato paste—like pasta sauce, chili, and pesto—use only a couple of tablespoons. If your paste comes in a tube, leftovers aren't a problem; but if it's in a can, don't toss the remainder or let it dry out in the fridge. Do this instead.
Step 1. Spoon tablespoon-size portions of tomato paste onto an ice cube tray and freeze.
Step 2. When the cubes are solid, transfer them to a plastic freezer bag.
Use the frozen tomato paste cubes directly in recipes; no need to thaw.
23: Cut Brownies and Bars Neatly Every Time
For perfect squares or rectangles, a spatula simply won’t cut it. Abide by this simple step-by-step technique to ensure that brownies and bars look as good as they taste. The secret ingredient: parchment paper.
Step 1. Before baking, prep the baking pan by brushing the bottom and sides with softened butter, using a pastry brush.
Step 2. Line the pan with a sheet of parchment, leaving an overhang on two sides, press it to adhere, and then butter it. Line with a second sheet of parchment perpendicular to the first (also with an overhang) and butter that, too.
Step 3. Add the batter to the pan, bake, and cool as directed. Then, gripping the paper overhangs, lift the brownies or bars from the pan and transfer to a cutting board.
Step 4. Using a large serrated knife, cut into squares or rectangles as desired, and then peel them from the parchment.
24: Keep Baked Goods Fresh
Most holiday cookies, bars, and squares will keep for up to a week in an airtight container, but what if you're planning on gifting them in a plain box? Try this to maintain freshness until you hand them off to the lucky recipient.
The trick: Wrap the entire gift in plastic wrap or, if the size allows, stash it in a resealable plastic bag. Protected from dry air, your sweet treats will stay moist and delicious for days.
25: Quickly Soften Butter
Forgot to take the sticks out of the fridge ahead of time? Here are two ways to speed up the process when you need room-temperature butter, stat.
Fast: Cut the sticks into pieces and set them on the counter. In 10 to 15 minutes, you'll be good to go.
Faster: Microwave the pieces on low power in 20-second intervals, checking between each one. The butter's ready when it's pliable, but not melty.
26: Freezing and Toasting Nuts
From storing to prepping, here's how to get the most out of these tasty little gems.
Freeze shelled nuts. To maintain their natural oils, which can turn rancid at room temperature, store each type of shelled nut separately in the freezer in a dated, airtight container. After a year, it's time to toss them.
Toast nuts. Toasting gives nuts more flavor. (Don't be tempted to skip this step in a recipe—the little time it takes has a great payoff.) Simply spread them on a rimmed baking sheet and cook in a preheated 180°C oven, stirring occasionally, until they're fragrant and their insides are golden (5 to 10 minutes). Break a nut in half to check.
Toasted nuts will keep for 2 to 3 weeks, stored in an airtight container in a cool, dry place is best. If you need to store them longer, freeze them.
27: Crisp Crust Every Time
There's no better way to ruin a great pie than with a soggy, underbaked crust. Follow our lead for foolproof shells—top and bottom.
Position your pie on the lowest rack, where most ovens concentrate heat. As the temperature rises, the bottom crust will crisp up before the exposed top crust overcooks.
Use a clear Pyrex pie plate. A quick peek reveals when the bottom is golden-brown (not pale and doughy), guaranteeing an indulgent, flaky dessert.
28: How to Measure a Turkey’s Temperature
Using an instant-read thermometer is the best way to get a moist, juicy turkey. But where to put it? The most important thing to remember: Never position the probe too close to the bone, or you’ll get an inaccurate reading. “Bones conduct heat at a different rate than meat, and can vary in temperature depending on where they are in the bird,” says Simon Quellen Field, author of Culinary Reactions: The Everyday Chemistry of Cooking ($17, amazon.com).
The trick: Insert the thermometer into the thigh horizontally until it touches the bone, and then pull it out slightly. Once the thigh—the part of the bird that cooks the slowest—reaches 75°C, dinner is ready.
29: Mess-Free Breading
Coating ingredients in flour, egg, and breadcrumbs is the surest path to an extra-crisp crust, but it can turn your hands into a sticky, clumpy disaster. Follow this tidy technique to solve the problem.
Step 1. Position the ingredients from left to right in this order: the foods you want to bread (in this case, tender chicken cutlets), flour, beaten egg, and breadcrumbs.
Step 2. With your left ("dry") hand, turn the chicken in the flour to coat both sides, then dip it into the egg bowl.
Step 3. With your right ("wet") hand, lift the chicken from the egg, shake off the excess, and then place it in the breadcrumbs.
Step 4. With your left ("dry") hand, turn the chicken in the breadcrumbs to coat both sides. Dab off any excess breadcrumbs, and then transfer to a clean plate.
Repeat with the remaining chicken.
30: Choosing Shrimp—Fresh or Frozen
Here's a fishmonger's secret: The glistening plump shrimp on ice at the seafood counter are actually less fresh than the ones in bags in the freezer. The reason? To help preserve them during transport, almost all shrimp are flash-frozen immediately after they're harvested. Except for most domestic Gulf and Georgia varieties, most "fresh" shrimp are actually frozen shrimp that have been thawed. Once thawed, shrimp are only good for 2 days.
Tip: Buy frozen shrimp and thaw them right before cooking by running them under cold water for a few minutes in a colander or sieve.